Verify that the humidity in the room is between 45 and 65 percent and, if required, decrease or increase the humidity in the room to achieve the appropriate level.
Check that the room humidity is between 45% and 65% and, if necessary, lower or raise the room humidity to the desired level. Before laying laminate, the floor must first acclimatize for at least 3 days in the same room where it will be installed.
General Things about Laying Laminate
- Laminate floors are always installed floating. This means that the floor does not have to be glued to the substrate. Laminate contains a click system, so you do not have to use seam glue when the floor is laid.
- You can leave the packs unopened during acclimatization. It is recommended to stack the suits around freely and not against a wall.
- A temperature of between 18 and 22 degrees is most suitable for laying laminate.
- Always cover the legs of your furniture with felt after installing the laminate. Never slide the cabinets or other furniture across the floor, to prevent damage.
Requirements for Laying the Laminate
When installing laminate, you need these tools: Hammer, saw, tensioning iron, spacers, tape measure, tapping block, pencil, and possibly a skirting cutter.
A substrate to Lay Laminate On
•Make sure that the surface is clean, dust-free, dry, and flat when you install laminate.
•The moisture content of underfloor heating may not exceed 1.5%. Have you just got a new surface? Then make sure that the moisture content is not more than 2.5%.
•Laminate should not be placed over floor coverings such as felt or carpet. The floor is covered airtight, as a result of which house dust mites and mold can develop. The soft surface also ensures loosening click connections. Laminate can be laid over synthetic floors. These must be well-cleaned. Examples of synthetic floors are PVC and vinyl.
With a wooden surface, it is important that the floor is completely flat. If this is not the case, the surface must be provided with an extra layer of chipboard plywood or underlayment. This must be fixed firmly and flat to the subfloor by means of screws (16 screws per m2). Connect this extra layer so that the plates are staggered. The wooden floor may have a moisture content of approx. 10%.
Underlay For Laminate Floors
A good subfloor is important for laminate. A subfloor is needed for:
- Sound attenuation
- Leveling the surface
- Moisture barrier
- Heat insulation
- Heat conduction (with under-floor heating)
Click Systems of Laminate Floors
There are 2 ways of click systems to lay laminate: Click laminate and quick click laminate.
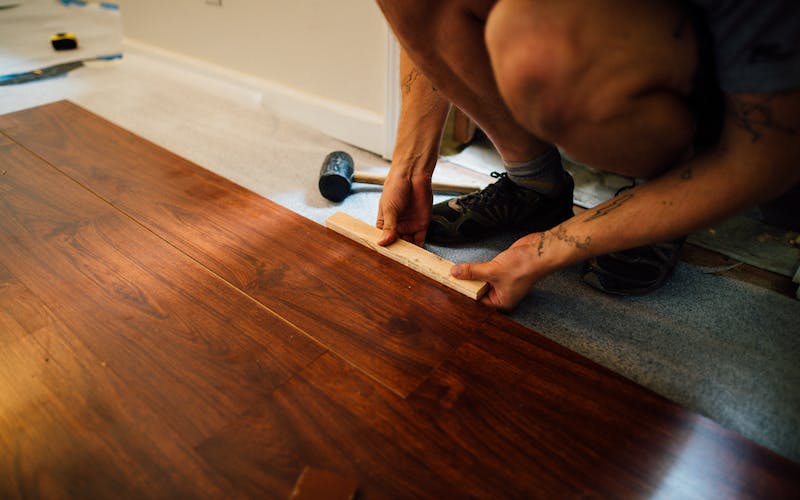
With click laminate, you click the planks together on their long sides at an angle of 45 degrees. You can tap the plank slightly with a hammer (and possibly a hammer so as not to damage the laminate) to make the laminate fall together properly.
With quick click laminate, you click the end side on the side of the colored strip with your fingers to the previous lamella (do not use a hammer or hammer block and do not hit it with your hand, then the click system will break). New parts gently click each time. If a slat has to be removed, you can do this by sliding the end side out. The longitudinal side must be tilted loosely.
Laying Laminate
Always start in a corner. Check the packaging carefully to see if the laminate has to face the wall with the knife or groove side. With spacers, you keep the floor 10mm from the wall. Then the laminate floor can still expand if necessary. Sometimes pipes run in the middle of the laminate part, which you can neatly work away with the help of a speed drill and a jigsaw.
Click the next part with the short side in the first part. You start again with the piece that remains and so you continue to lay laminate until you have a nice playful effect on your floor. Turn the last part of a track with half a turn and place it 1 cm from the wall. Mark at the end of the previous section and cut to size or saw with a laminate cutter.
Take your time for the first two lanes that have to fit together perfectly. If this is not the case, the laminate will not click together properly. You start each new job with a sawn-off part of the last piece of laminate that is left. That part should not be shorter than 30cm, otherwise, cut 30cm from a new plank. Use laminate from different packs together so that the color difference is well distributed. Please note that a distance of 10mm must also be kept between the wall and the last row. The laminate floor can be used immediately after it has been installed in the room, so: Please note that a distance of 10mm must also be kept between the wall and the last row. The laminate floor can be used immediately after it has been installed in the room.
Saw Tip When Laying Laminate
A laminate cutter works easily when you are going to lay a laminate floor. It is also possible to cut laminate with a jigsaw or a handsaw. When you see the laminate with a jigsaw, make sure that the wood structure lies downwards. With a handsaw, the structure should be facing up. This is to prevent saw splinters.
With laminate, you choose a maintenance-friendly and durable floor with a good price-quality ratio. You can also easily and quickly install laminate yourself.