


Any hardware store has an angle grinder. The tool can be used for a multitude of uses. Hence, the device has become an unavoidable tool in workshops. But the point to be noted is that different tasks require different sized angle grinder. This is to be selected based on the level of the job to be completed. The most used size range is the 4” angle grinder as most of the daily cutting and grinding needs of most metal types shall be done with this type.
A significant feature of an ordinary grinder is its versatility. It can be used to handle different configurations possessing accessories and wheels quickly. The main parts of a typical angle grinder are the spindle washer, a protective cover, and the handle.
If you’ve just landed on this site before reading my Angle Grinder guide, be sure to read this first.
Step-by-step procedure on how to employ an angle grinder to cut metal
Before entering the task of cutting the sheet metal using the angle grinder, you must ensure that you have the right accessories and tools by your side. Keep in mind that different models of the equipment work differently. Thus the operators must go through the instruction manual provided by the manufacturer along with the machine before starting to use it. However, the typical procedure adopted is explained in detail in a step-by=step method in the following excerpts.
Step 1: Gather the necessary tools
Once you have set aside all the required tools, the task of cutting shall be progressed quickly. The possible means that you must acquire before initiating the cutting process are listed below.
- Angle grinder
- Right-sized metal disc
- A power cable that is long enough
- The work sample/template or the shop drawing
- Earmuffs
- A suitable power source
- The material of metal that you propose to employ
- An AC clamp (To clamp and support the project metal)
Step 2: Keeping the safety tool beside
In phase 1, all the tools required for the smooth progress of the cutting process are listed. However, safety is a significant concern. For this, you need to have some other material which is as listed below.
- Hand Gloves (for safeguarding your hands and fingers)
- Safety boots for your feet
- Eye goggles for your eyes to avoid sparks from hitting it
- Correctly fitting cloth
- Secure floor- the working region should not contain traces of water spillage, litters, and other obstacles.
Step 3: Grinder preparation
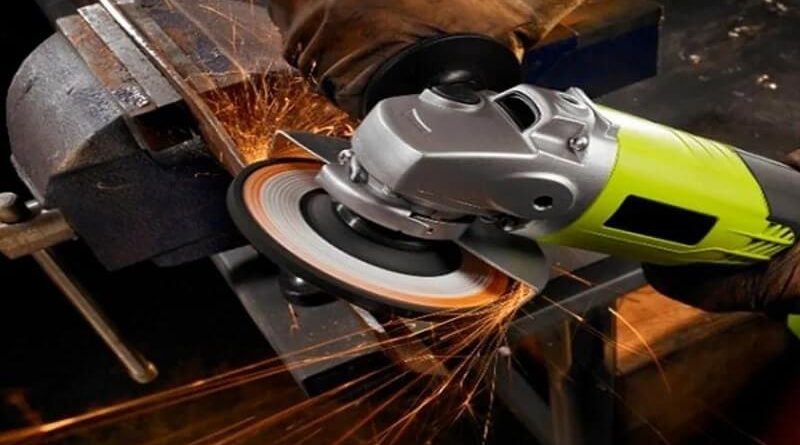
The next step is to get your grinder ready for the operation. Check that the tool is not plugged in. Also, make sure that you have taken all the prescribed safety precautions. For this, first, open up the spindle and then insert the right sized metal disc into it. Then tighten the spindle nut.
Step 4: Stain the line of cut.
The next step is to clamp the metal on the worktop. By using a suitable scratch awl, outline the desirable pattern in which the metal has to be cut out on it. Any suitable design can be chosen.
Say, if you want a straight line cut, the two ends of the line shall be marked, and along the line, a scratch shall be etched. On the other hand, if the design follows any particular pattern, the various bends have to outline, the straight points shall be etched using a scratch awl, and the complete design shall be highlighted.
Step 5: Switch the machine ON and begin cutting
Once you have marked the outlines, the grinding can be initiated in the very next step. You must plug in the tool and use both the hands to hold the angle grinder. Now, start cutting the metal. Begin by striking a soft tap on the marked line when the disc has started spinning.
Be sure to hold the grinder using both hands. Also, to make sure that the equipment does not slip away from your palms, begin lightly. Follow accurately and carefully the path of the proposed set alignment.
Step 6: Avoid careless change of directions
There are high chances that the grinding shall be improper if you are sloppy at any point. It is advisable that along the set line, the tool is made to move back and forth to make sure that no possible errors occur. Ensure that while encountering a change of direction, you are extra-careful. Rapid direction changes can bring in adverse impacts.
While progressing with the grinding process, you will be able to note that the cutting does not take place as quickly as it had initially by applying more pressure on the tool to penetrate the rod. However, you must go on continuing the process until the full thickness of the metal plate has been penetrated.
Step 7: Complete the process of cutting
As you move the cutter along the desired line of cut, the grinding can be finished finally. You can then observe that the edges of the grind are sharp, which makes it dangerous to be worked on it. For solving this issue, the disc shall be removed and employ a 40-grit flapper. On the cut edges that are still sharp, run the tool along the line. Your cut now becomes smoother and ready to be handled.
Some more tips for cutting different metals
Once you are done with the cutting, rest for a few hours so that your machine cools down. After this period, only use the tool to do the next cutting.
Angle grinders are tools that can be used conveniently to cut many different types of metals. Some of these are sheet metals and hard metals. Along with this, the hard metal requires secure tightening. To grind this type of metal quickly, one can even use a diamond disc.
Though the cutting can be completed swiftly and effortlessly using a suitable sized angle grinder, the fact that it is a power tool invokes danger if handled carelessly. Thus, you must follow all the safety measures mentioned to avoid any possible harm.
The most important thing is that while dealing with such type of tools, you must read the instruction manual carefully before putting it to use. This can ensure that you enjoy a trouble-free and harmless cutting, to an extent.